Just for information, the steps in making a model go something like this:
1. Decide what it is you want to build. Either someone elses design or your own design. Each has its own difficulties.
2. Plan how you are going to build it, how you break the design into easy to build components and the order in which to build them. And how complex is the mesh going to be (i.e. what polygon budget are you working to). For A2 you are probably aiming at the 3k poly sort of level (although you can get away with higher if its a unique or rare ship or you just want to do beauty shots). For high quality art like the stuff made by Jetfreak or ISS E you want higher polygon models so that the rough edges are lessened and you get better depth perspective on detail because it is physically there. Think of it in terms of how many sides make a circle, a 48 sided circle will look more circular close up than a 24 sided circle, however at a distance a 24 sided circle will probably be alright to use.
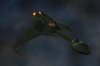
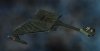
3. Now the fun bit (for me anyway), try to make a mesh that looks like the design. Sometimes you succeed, sometimes not, the trick is knowing when to declare victory and move on. If it's someone elses design that becomes a little harder because you know what the end result is supposed to look like. Conversely, when I built the Righteous it ended up looking very little like my original sketch.
4. UV map the mesh (the tedious bit). This is essentially "unwrapping" the mesh onto a 2D surface. We do this because textures are 2D and need to cover a 3D shape (think of how you would make a cube out of a sheet of paper).
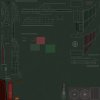
5. Make the textures. These will be arranged as per the uv map (think of it as a colouring book - the bits of texture you will see on the mesh need to stay inside the lines). See attached as an example. I haven't included any detail here because this is probably more complex than making the model itself - it certainly takes me far longer to make textures than make a mesh!
6. Make the alpha map. In A2 this is embedded in the tga and we use this to highlight glows (jpegs don't have the ability). Some software use alphas within a file to do transparency. For my Maya renders I use separate files to map the glowy bits (oddly enough named light maps, glow maps, incandescent maps or something along those lines). We can also have bump maps which give the illusion of depth - but A2 doesn't use these.
7. Material selection - we need to use the right material to give the design its looks (lambert or phong usually - it generally describes how the material reflects light, as if its matte plastic, shiny metal, etc) and assign the texture to the material and the material to the design. For A2 we also name the material to ensure characteristics like alphas are used.
8. Hard point mapping. This is how we define things like where phasers fire from or where the ship can be hit. It's what the game understands as "physical" parts of the model. There is an excellent tutorial my Major Payne which describes this for A2 (and I still refer to it each time I make an A2 mesh).
9. All the misc A2 stuff - odf writing, tech tree, sprites, Admirals log, build lists, etc. I won't go into detail as I'll be here forever.
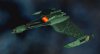
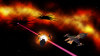
10. Renders and compositing an image. This is the magic that Jetfreak and ISS-E do so well, making the pretty picture around a ship. You need to light the ship and match it to the background, some of this can be done in the 3D software package (e.g. Maya or 3DS MAx) and some will be done afterwards in "post" using Photoshop or Aftereffects. For example, in my attached Entil'Zha image, the fleeing Whitestar has an illuminated underside from the explosion. The illumination was done in Maya, but was then emphasized in Photoshop. The explosion and laser were also added in Photoshop afterwards.
Anyway, apologies for the thread hijack (*slaps wrist* bad kjc) but I thought I'd try to improve your understanding of what goes into making models.
 I know it's way harder than it's always portrayed or given people credit for.
 ")