I am interested in what you guys do for your art asset creations. Like the number of textures you use, how you determine your UV layouts, geometry requirements, etc.
This is a bit like asking how long is a piece of string - the answer is as long as I need it to be. But I'll take a crack.
A lot of the art on this site is made using A2, SFC or BC meshes, therefore the artist does the best with what they have. They may refine the textures a bit, or even touch up the mesh, but they will be using whatever mesh they can use which is available.
For A2 I prefer to keep my count in the 2k to 3k range, and try to fit the textures onto 1 or 2 files. This is more to do with the limitations of the game engine than anything else.
However for art, the answer is: Whatever is required to make it look good. My Galaxy Conqueror is (from memory) in the 8k mark and doesn't look particularly good because its not smooth enough, the saucer is too jagged. But it's good enough for A2 (although poly heavy). My Intrepid refit is probably in the 70k region.
Texturing is similar, what can you get away with? If the mesh is relatively clean and simple then you can probably fit the entire mesh on a single low resolution texture. If the mesh is complex then you need to break it out into smaller parts. If the textures are complicated, then you may need to unwrap the mesh more carefully so as not to distort the textures on the mesh.
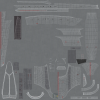
With regards to mapping, for the larger meshes I try to split my mesh into logical components and then also do the detail separately. For example, on my Intrepid Refit I used three main texture files:
- Saucer
- Secondary Hull
- Nacelles
The Saucer file obviously included the saucer hull, which I mapped as a plane from above and below for the upper and lower surfaces. I mapped the rim from the front and sides and stretched the uvs as required to ensure the texture was consistent. I also mapped the main and bridge sensor arrays (both integral parts of the saucer mesh) to this texture, but mapped them separately so there was no chance of rough edges on the texture.
The Secondary Hull was mapped from above and below for the flat portions of the hull, from the sides for the rims and upper sides, but also at an angle (approx 45 degrees) for the curved sections. Again, some manual adjustment of the uvs was required to fix distortion. Where the texture is meant to be symmetrical, I overlapped the uvs so that I was using less space (e.g. I only had to texture one pylon, the other occupies the same area on the texture).
The Nacelles were mapped from top, bottom, sides as would be expected. I also used the Nacelle texture file as my "home" for miscellaneous bits. So the bridge, phasers, launchers, lights, windows etc were all on this file. I always prefer to map separate components separately, as they don't necessarily have to be on the same scale and it helps me keep them away from the surrounding hull texture.
In addition to the main files, each texture file also has a Incandescence map (for glows) and a Bump map (for illusion of depth). For ease of changing names (and because I had mirrored geometry) I also had a TIF texture file for names. I duplicated parts of the mesh that have a registry and placed it a tiny amount above the original hull. The Registry was painted with an alpha map, so that the rest of the file was transparent, meaning that when rendered the only thing visible is the registry itself, with the original hull behind it.
Some general tips:
- Try to map general hull areas so that they are the same relative size, that way the background (including aztec) textures match up and you don't get different parts of the ship at different resolutions.
- When mapping using plains, try to map the components logically. By that I mean map up to a natural seam in the geometry, i.e. a corner. If you do that then any irregularities in how the texture changes from one part to the next is hidden (because we can't see around corners).
- Depending on how good your render software is, try to make as big a texture as possible. I'm using 2048 x 2048 but that's because I'm limited by my version of Maya. The bigger the texture file, the more detailed you can be (or the more ship you can fit on one file for the same resolution) - but beware of processing limitations.
- If you are struggling for a logical way to map your ship, see what other people have done. For my Intrepid refit I was using Aads A2 Intrepid class as a general template for the geometry and the textures. I figured out how I wanted to break my mesh up, separated his textures into my files, sized them to fit and then uv mapped parts of my mesh to his textures. Finally, I replaced his textures with my own. Whilst Aads textures are great, they weren't designed for my mesh, so the end result wouldn't have looked good. They were a real help with placing things (especially escape pods) but you need to make textures for your mesh.
- Jpegs are a low memory file, but they achieve this by some quite lossy compression. I use jpegs on my arty ships simply because my version of Maya is quite old and that's the best compromise. They don't look too bad, but if you get close and know where to look you can see some blurred edges. If I were able, i'd use png files as they seem far superior in quality, albeit with a bit of an increase in memory size (not too bad though, they are my "go to" file for putting images in documents).
As an example, I've attached the uv maps for my Intrepid II. Hope this helps.
EDIT - ok, having a few problems with attachments right now, will try again later. Sorry.