• Hello and welcome to MSFC. We are a small and close knitted community who specialises in modding the game Star Trek Armada 2 and the Fleet Operations modification, however we have an open field for discussing a number of topics including movies, real life events and everything in-between.

    Being such a close community, we do have some restrictions, including all users required to be registered before being able to post as well as all members requiring to have participated in the community for sometime before being able to download our modding files to name the main ones. This is done for both the protection of our members and to encourage new members to get involved with the community. We also require all new registrations to first be authorised by an Administrator and to also have an active and confirmed email account.

    We have a policy of fairness and a non harassment environment, with the staff quick to act on the rare occasion of when this policy is breached. Feel free to register and join our community.

3DS Max Lightmap Problems

O

Ozymandias

Deleted Due to Inactivity
Former MSFC Member
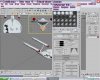
I'm having problems getting lightmaps to work with a model I've made in 3ds max. The lit parts of the model are the only parts that are visible (every other part is completely transparent).

I have tried various combinations of material name (!phong_01_!default, !phong_01_!lambert, !lambert_01!default) and have checked both ingame and in storm 3d but the result is always the same.

I've applied the texture to Admiral's Sovereign and the alpha chanels are working correctly there so it can pretty much only be something to do with the SOD. I have also applied Admiral's Sovereign textures to my model and again it ends up invisible.

I've tried downloading the 3ds max A2 exporter from several different sites and I just can't work out what the problem is.

I've attached a screenshot (The grey bits are supposed to be there but hidden inside the model).

Oh and I'm using 3ds max 5.1 if that makes any difference.

I'm wondering whether material settings need to be applied via a command node in 3ds max?

Any help would be greatly appreciated. Thanks.
 

Attachments

  • problem.png
    problem.png
    72.8 KB · Views: 13

Starfox1701

Master of the Arwing
Warrant Officer
Joined
29 Jan 2008
Messages
2,561
Age
48
It looks like you have the A1 exporter not the A2 exporter. How exactly do you have the channels on the material set?
 
O

Ozymandias

Deleted Due to Inactivity
Former MSFC Member
It looks like you have the A1 exporter not the A2 exporter. How exactly do you have the channels on the material set?

This is the exporter I downloaded: 3DS_Max_Exporter

The materials are set to the default 3ds max settings the BBOM doesn't mention anything about changing them. I've attached a screenshot.
 

Attachments

  • materials.png
    materials.png
    81.7 KB · Views: 5
O

Ozymandias

Deleted Due to Inactivity
Former MSFC Member
This is the exporter I downloaded: 3DS_Max_Exporter

The materials are set to the default 3ds max settings the BBOM doesn't mention anything about changing them. I've attached a screenshot.

Hmmm I've just re read the BBOM it seems I missed some steps setting up lightmaps.

The resulting material now looks like the following attachment. It hasn't helped though still the same result.
 

Attachments

  • materials.png
    materials.png
    88 KB · Views: 5

Amateur

Waiting for Godot
Joined
29 May 2006
Messages
755
Age
34
Going from what I know of Max (I use Max 8, so have never exported to Armada - what I'm about to say may be completely useless) try ticking the 'alpha as grey' under 'RGB Channel Output' and/or 'alpha' under mono channel output.

I've had prioblems with GI renders without one or both of those ticked. So far, I haven't noticed a pattern - it may be Max randomly annoying me :)
 
O

Ozymandias

Deleted Due to Inactivity
Former MSFC Member
Going from what I know of Max (I use Max 8, so have never exported to Armada - what I'm about to say may be completely useless) try ticking the 'alpha as grey' under 'RGB Channel Output' and/or 'alpha' under mono channel output.

I've had prioblems with GI renders without one or both of those ticked. So far, I haven't noticed a pattern - it may be Max randomly annoying me :)

Still no luck nothing seems to affect the output. It's driving me nuts.
 

Starfox1701

Master of the Arwing
Warrant Officer
Joined
29 Jan 2008
Messages
2,561
Age
48
This is the exporter I downloaded: 3DS_Max_Exporter

The materials are set to the default 3ds max settings the BBOM doesn't mention anything about changing them. I've attached a screenshot.

Hmmm I've just re read the BBOM it seems I missed some steps setting up lightmaps.

The resulting material now looks like the following attachment. It hasn't helped though still the same result.

Try locking the colors on the ambiant, diffuse, specular and set to black like this
 

Attachments

  • 1.jpg
    1.jpg
    782.2 KB · Views: 8
O

Ozymandias

Deleted Due to Inactivity
Former MSFC Member
Try locking the colors on the ambiant, diffuse, specular and set to black like this

Still no change. I also changed the basic shader parameter to phong like in your image. Any more ideas would be very welcome.
 
O

Ozymandias

Deleted Due to Inactivity
Former MSFC Member
Try looking in here

MSFC

Ahhh wow thank you so much.

It as the last step before applying to the model. The BBOM doesn't mention it until later in the chapter after the bump mapping section. I just found it now before I read your post. Came back to explain how to get it working. Thanks for all your help.
 

Starfox1701

Master of the Arwing
Warrant Officer
Joined
29 Jan 2008
Messages
2,561
Age
48
now I'm having a problem:( I'm getting these black spots
 

Attachments

  • 1.jpg
    1.jpg
    346.3 KB · Views: 13
  • 2.jpg
    2.jpg
    332 KB · Views: 11
  • 3.jpg
    3.jpg
    267.5 KB · Views: 10
Last edited:
O

Ozymandias

Deleted Due to Inactivity
Former MSFC Member
now I'm having a problem:( I'm getting these black spots

Hmm no idea I thought I saw something on filefront about this but I can't find it now I look again.

I hear bump maps really affect lighting it's nothing to do with that is it?

Or maybe have those faces some how flipped over and have you got backface cull on?
 

Starfox1701

Master of the Arwing
Warrant Officer
Joined
29 Jan 2008
Messages
2,561
Age
48
Non of the above I'm afraid:sweat: 
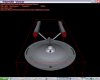
I'm starting to think smoothing errors but have no idea what to do if it is:confused:
 

Avon

The older I get, the more I forget
Joined
28 Dec 2006
Messages
491
I'm starting to think smoothing errors
I think you might be right, but check it in-game as well. I've had stuff before look wierd in the storm3d viewer, but look fine under game lighting
 

Majestic

Administrator
Staff member
Administrator
Seraphim Build Team
Joined
17 Apr 2006
Messages
18,367
Age
39
I think you might be right, but check it in-game as well. I've had stuff before look wierd in the storm3d viewer, but look fine under game lighting

I agree totally, S3D is known to screw the view of a model up, but it looks fine in-game. I never use that program anymore because of this.
 

Starfox1701

Master of the Arwing
Warrant Officer
Joined
29 Jan 2008
Messages
2,561
Age
48
Really I would have never guessed since they are suppose to be the same engine at work:oops: I'll check and let you all know
 

Terra_Inc

MSFC's Cheshire Cat
Staff member
Site Manager
Necromancer/Troll hunter
Kitten Commander
Joined
16 Dec 2009
Messages
3,142
Age
34
I agree totally, S3D is known to screw the view of a model up, but it looks fine in-game. I never use that program anymore because of this.

Thirded. I've got several models that are perfectly fine in-game, but Storm completely ruins them. :sweat:
 

MrVulcan

Crewman 2nd Class
Joined
17 Aug 2011
Messages
142
I can't speak for A2, but I've seen this problem on many models in A1. Usually, the problem comes down to one of two things: incorrect vertex welding, or collapsed polygons (the three verticies of a single poly are not distinct so that two or all three verticies are at the same point.)

Incorrect vertex welding is somewhat easier to fix, so I'll explain that first. Basically, this happens when you have a sharp angle on the model, and the vertices of adjacent polies that make the sharp angle are welded together. The polies should normally belong to different smoothing groups, but because vertices between the polies are welded together, Storm considers them as part of the same smoothing group.

Ok, hopefully that made sense. But even if it didn't, you can try to fix the dark spots by breaking the vertices between the dark polies. I think in milkshape, "breaking" is "unweld". So if that makes more sense, try unwelding the dark polies from the rest.


Now, the other cause can be collapsed polies.

When this happens, Storm doesn't know how to apply lighting properly to the collapsed poly. When the poly is also attached to a normal polygon, that polygon will exibit some strange light patterns and dark spots like the ones in your screenshots.

But don't despair, you can fix this, although in might take some patience :)

Try to hide as much of the model as possible. This makes the screen less cluttered. Next, select the good polies surrounding the dark spots, including the dark spot. Be sure to select one poly at a time (do not drag-select). In 3ds max, I would detach the good polies and then hide them (can't remember whats the equivalent to "hide" and "detach" in milkshape, but hopefully the meaning of each is clear).

When the area around the dark polies is clear, try drag-selecting around the area. If the problem is a collapsed poly, then you will have selected the collapsed poly. Delete it for good :) collapsed polies are evil and should be banished from the land of SODs :p.

Ok, now you can unhide the hidden polies and reattach them to the main mesh. You may have to weld together vertices that were broken when you detached the good polies. The dark spots should be gone now!

Let me know if something isn't clear. I can try to provide pictures to illustrate if anyone is interested. I realize that the procedure is kinda complicated.
 
Top