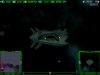
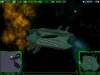
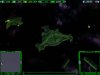
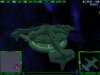
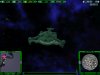
This folder contains my version of the Romulan base and the Romulan advanced yard.
Important Note:
Make a backup of your existing files, because most files in this folder will overwrite the stock files!
Credits:
As allways, thanks to Wrath of Achilles for his Texture Tutorial and Major A Payne for his SodTutorial.
All meshes, textures, etc are by me.
Please note:
I cannot be hold responsible for any damage or problems otherwise regarding this model.
You may use this ship in your mod, just give credit where its do.
Thank you for downloading.
++++++++++++++++++++++++++++++++++++++++++++++++++++++++++++++++++++++++++++++++++++++++++++
Installation instructions
Open the SOD folder -->
Put the sod files into the sod folder of Armada II. When prompted to overwrite, click 'yes'.
Open the ODF folder -->
Put the odf file into the odf station folder of Armada II. When prompted to overwrite, click 'yes'.
Open the Texturefolder -->
put the tga into the texture RGB folder of Armada II. When prompted to overwrite, click 'yes'.
( I include the MS3D files for those who are interested.)
Open the Bitmaps folder -->
Open the Bitmaps folder of Armada II --> open Admiralslog --> open ShipImages and put the images there.
When prompted to overwrite, click 'yes'.
****************************************
Open Sprites --> open gui_global
find the lines:
# Romulan build buttons
@reference=256
delete the following lines:
rbasew1 romwireframe04 0 96 48 48
rbasew2 romwireframe04 48 96 48 48
rbasew3 romwireframe04 96 96 48 48
rbasew4 romwireframe04 144 96 48 48
rbasew5 romwireframe04 192 96 48 48
ryard2w1 romwireframe05 0 0 48 48
ryard2w2 romwireframe05 48 0 48 48
ryard2w3 romwireframe05 96 0 48 48
ryard2w4 romwireframe05 144 0 48 48
ryard2w5 romwireframe05 192 0 48 48
next:
find the lines:
@reference=128 (if not present, just add the reference)
add below that list:
rbasew1 wfrbase 0 0 128 128
ryard2w1 wfryard2 0 0 128 128
********************************************************************
That should do it.