Rifraf
I know just enough to be a danger to myself
- Joined
- 25 Aug 2013
- Messages
- 1,225
- Age
- 51
I'm not sure how many of you actually play A2 anymore, but this should be applicable to FO as well? I started a thread on AI over at FF and FO last year/this year respectively and Freyr and Dominus_Noctis were very helpful in talking about how the AI works and such. Earlier this year I PM'd with Freyr quite a bit and put together a redone AI in hopes of continuing that aspect of any previous work. I thought I'd share the results of my testing if anyone is interested. I did release some new AIP files over at FO and can do so here if anyone would like to try it. Some feed back would be nice.
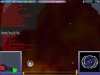
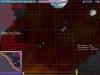
The values listed are from stock Armada 2, but I did my actual testing on my personal build and continue to refine the values. By watching the minimap in the debugger and lining up freighters with the grid overlay and how they corresponded to the colored squares of the threat, goal, explore, and death maps I was able to determine what appears to be happening.
So, each gameplay map grid is 100x100 units or a 1x1 grid as evidenced by the grid overlay on screen (alt-G) and sensor/weapon ranges are bound to this.
Each strategic map grid is 400x400 units or a 4x4 grid as evidenced by AI-Grid-Size=400 in the RTS-CFG under the strategic AI section.
The strategic-ai-cfg.txt file in the AI folder contains all the strategic parameters:
// How many tiles per threat mapgrid?
#define threat_map_resolution 800
// How many tiles per death mapgrid?
#define death_map_resolution 800
// How many tiles per our empire mapgrid?
#define empire_map_resolution 800
// How many tiles per enemy empire mapgrid?
#define enemy_empire_map_resolution 800
// How many tiles per exploration cell?
#define exploration_map_resolution 800
// How many tiles per goal cell?
#define goal_map_resolution 800
// Iteration for relaxing grid borders
// NOTE: DO NOT CHANGE
//
int relaxation_cycles = 1;
// Relaxation bleedover
// NOTE: DO NOT CHANGE
//
double relaxation_coefficient = 0.5;
Every ship/station with an "attackpower=XX" value in its odf (anything with a weapon should have it) projects an initial threat of 800x800 units or an 8x8 grid as specified by #define threat_map_resolution 800. This is 800x800 units total from its center point not in each direction from its center.
The "int relaxation-cycles=1" setting controls how many strategic map grids to spill the threat over into. So a setting of 1 would mean the threat gets spilled over into 1 strategic grid (400x400 units or 4x4 grid) in each direction from the edge of the initial 8x8 threat grid. 2 would be 2 strategic grids each direction and so on.
The "double relaxation_coefficient = 0.5;" is the percentage of the threat that gets spilled over into other strategic grids. So .5 is 50 percent and 1 is 100 percent. I feel this should be 1 or at least above 90% so that all the threat gets spilled over into the next grid to help the AI better judge where the danger is.
Now the relaxation-cycles and the relaxation-coefficient parameters each appear in the all the AIP's in the AIPs folder so you can further fine tune each AIP separately.
There is also this:
// How much to reduce danger recorded in grid cell each cycle
// NOTE: DO NOT CHANGE
//
double danger_diminishment = 1;
There's no way to test that but I think it means that 100 percent of any threat is reduced each cycle which to me seems pointless. Why reduce the threat completely and so quickly. I've changed mine to .05 or 5% of the threat gets reduced each cycle to keep the threat around a little bit longer. May help the AI play better and not just rush into danger head on so quickly.
When the AI loses a unit it references the death-map-resolution and paints an area of danger from the grid it lost its unit in of 800x800 units. 800 is a bit large to me depending on weapong ranges.
The exploration-map-resolution is the size of the area it considers explored. 800 is a bit large in my opionion unless you have your sensor range at 800.
The empire and enemy-empire-map-resolution is the size of your and your enemies empire. I feel you would want this to be a little bit bigger than your total threat area to emphasize your region of control and then beyond that is open space or the perimeter.
The goal-map-resolution corresponds to the strategic goals. This you can watch in the minimap in the debugger as it's the first mode to choose. You can see the areas the AI chooses to explore and what it assigns to protect and where it marks resources it finds.
I can change the strategic-ai-grid size to any number (I went as low as 100) and the game still played. However, the threat-map-resolution has to be a minimum of 400 or the maps start to crash (in stock A2.) And the threat-map-res and goal-map-res values must be linked somehow because even if they are different values the strategic grids for those are always the same size and it's the threat-map-res setting that determines that size.
Also, the empire-map-res and enemy-empire-map-res values don't seem to be affected by the relaxation-cycles setting or threat spill over. The value set for each (and I think they should both be the same size) as represented in the strategic map view is the size that it appears on screen.
For your star base no matter what the threat map is set at the threat map grid is never centered on your base like one would think it'd be which kind of sucks. So one or two sides of your base might project a threat 4-10 grids out but the other two sides would be left with the remainder of 10-18 grids out which kind of skews the threat locations slightly depending on your threat-map-resolution value.
One of the most important things that needs mentioning (if you're modding stock A2) is that your attackpower = XX value in each ship/station odf (that have weapons) should have a minimum value of 1.0 as Freyr suggested years ago in his AI work. I see FO as of 3.2.6 has this, but not sure of earlier versions. The reasoning is that it's used to calculate how the AI determines attack parameters and anything less than 1 is actually dividing its outcome which is less than optimal. Most people probably already know this, but thought it was worth mentioning.
Regards, Rifraf
")